LBaaS with NSX Advanced Load Balancer and Cloud Director


Introduction
NSX Advanced Load Balancer (ALB) is a software-based application delivery controller that provides load balancing capabilities for applications deployed in data centers and public clouds. It offers a variety of features such as load balancing, SSL/TLS offloading, content switching, application acceleration, and advanced security.
Overall, NSX ALB provides a powerful set of tools for managing application traffic, ensuring high availability and performance.
The integration with VCD allows NSX ALB to automate load balancer deployment and configuration for tenant applications. NSX ALB can be deployed as a service offering within VCD, and tenants can easily select and configure load balancing services for their VMs through the VCD self-service portal.
Shared and Dedicated Models
NSX ALB provides multi-tenancy support in VCD, this can be achieved with a Shared or Dedicated Model.
In the shared model, multiple tenants or customers share the same set of load balancing resources. This deployment model is suitable for service providers who want to offer load balancing as a service to multiple customers while minimizing the infrastructure (Service Engine Group) requirements.
In the dedicated model, tenants have their own set of load balancing resources (Service Engine Groups) that are dedicated to their tenancy. This deployment model is suitable for organizations with high traffic volumes and for Service Providers that want to segregate their tenants as much as possible.
My Deployment:
| Component | Version |
|---|---|
| vCenter Server | 8.0.1 (21560480) |
| NSX Advanced Load Balancer Controller | 22.1.3 |
| NSX | 4.1 |
| Cloud Director | 10.4.2 |
Deployment Process
Pre Deployment
A few requirements which I wont be covering today are a vCenter, NSX and Cloud Director instance in working order and integrated in VCD. VCD also needs a Org with an orgVDC that has a Edge Gateway attached.
Deployment preparation:
- A Tier 1 and Tier 0 router in NSX, this is dedicated to the ALB Deployment, The tier 1 is linked to the T0 and the T0 has BGP configured to the physical router. Both Routers advertise Static Routes and Connected Interfaces & Segments  
- alb-se-mgmt segment in NSX for the Service Engine VMs, NSXALB has IPAM capabilities but I enabled DHCP on the Segment itself, each Service Engine will be allocated an IP from this pool when deployed. 
- A content library in vCenter, this will store the Service Engine OVA for deployment.
OVA Deployment and Config
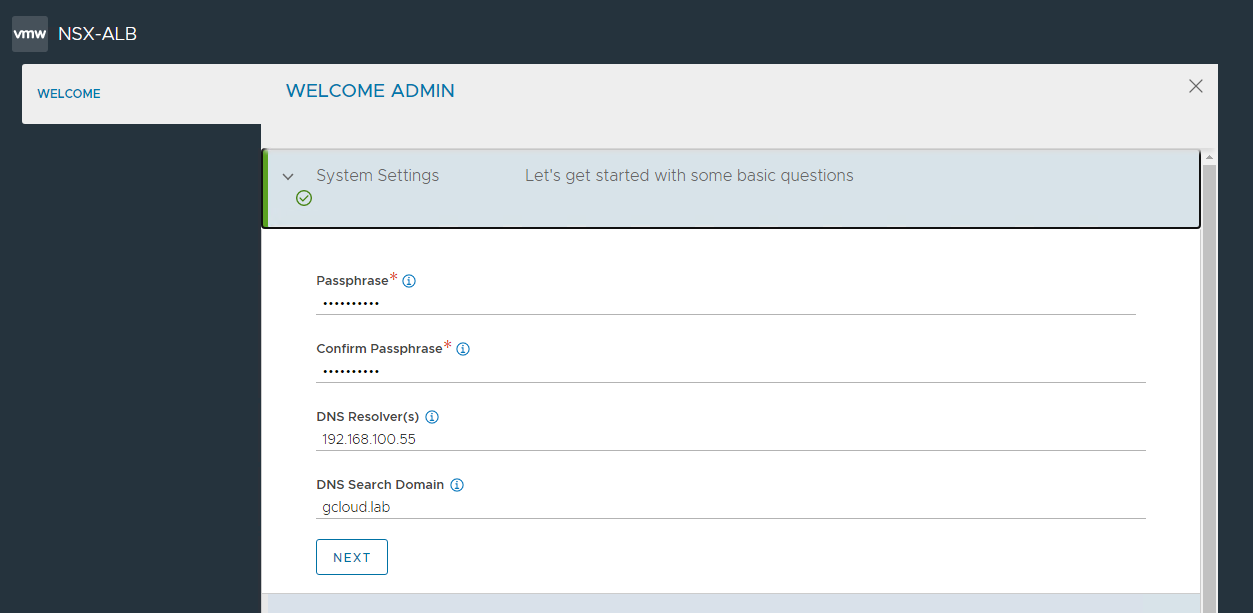
Deploying the OVA was straight forward, you need to see a management IP Address for your controller, this is different to the alb-se-mgmt IP created earlier, the controller should be on a management network similar to your NSX Manager and vCenter server. Once the OVA is deployed you set up an admin account and run through an initial deployment wizard.
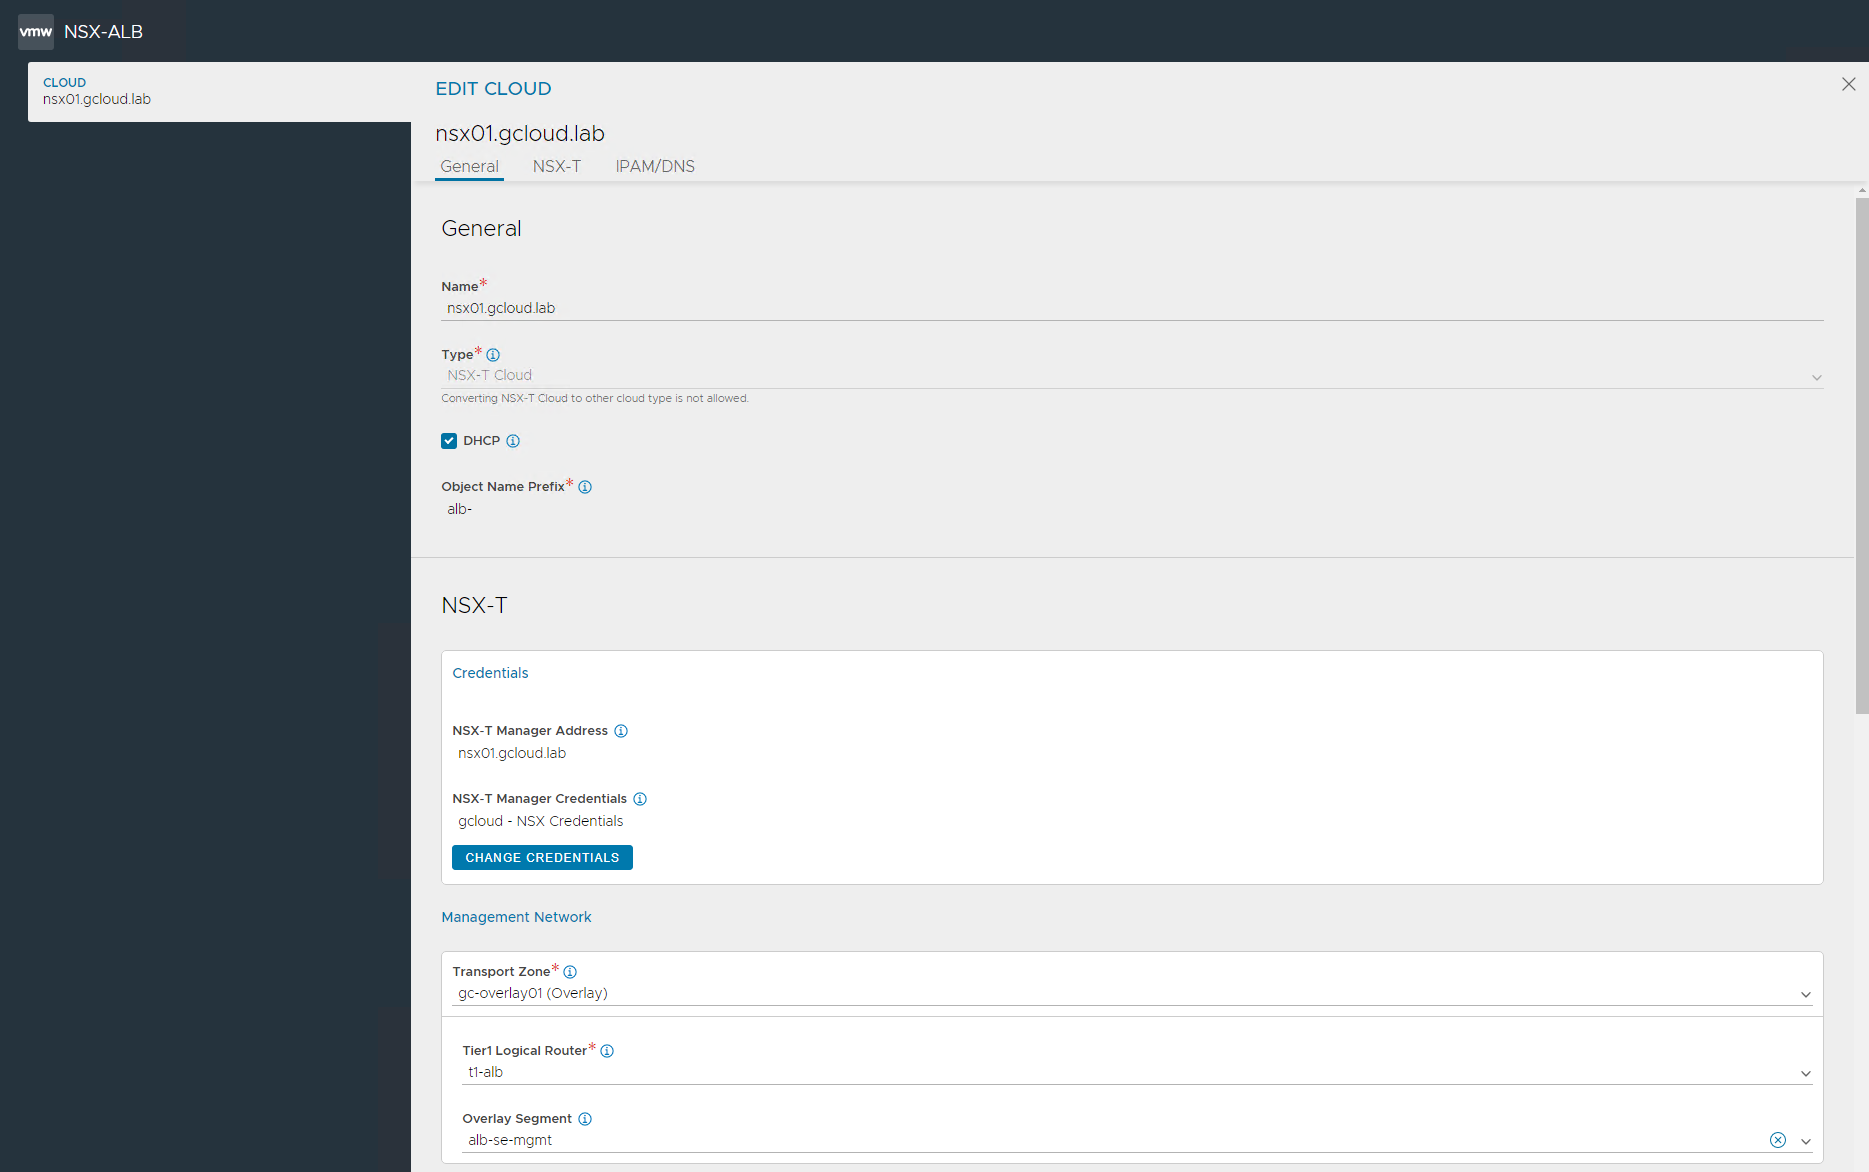
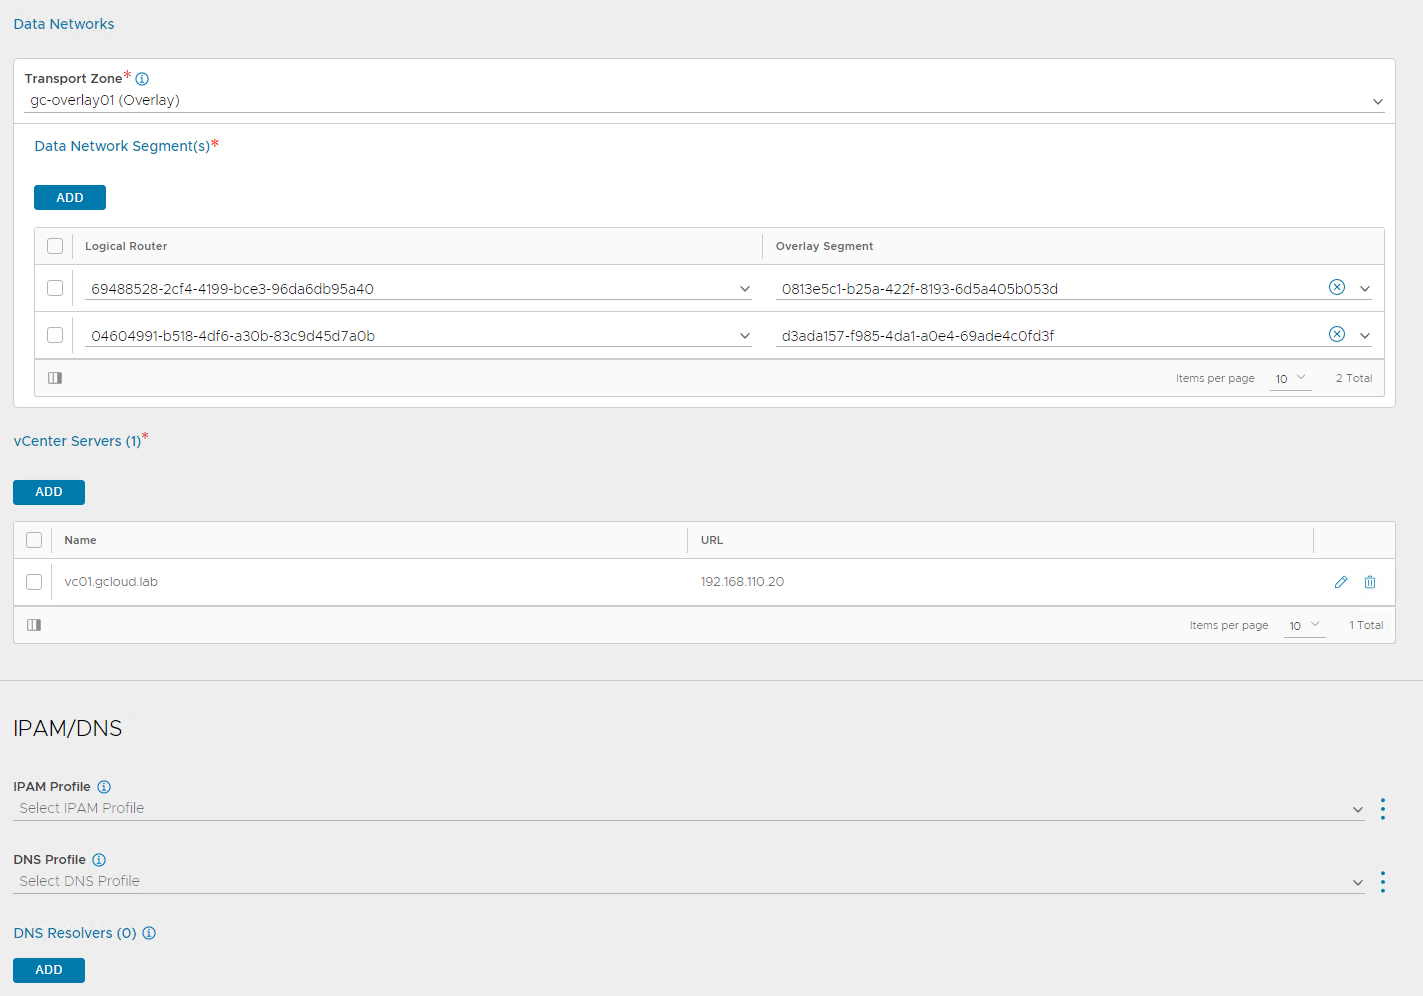
Create NSX-T Cloud
Once logged in, create the NSX-T Cloud in ALB. Navigate to Infrastructure » Clouds » Create » NSX-T Cloud and enter all required fields.
In this deployment DNS Resolvers and IPAM was ignored, DHCP was also ticked since its enable on the alb-se-mgmt network. in Data Network the NSX overlay transport zone needs to be defined along with the alb T1 router and mgmt segment.
VCD Configuration
ALB Config is done by navigating to Resources » Infrastructure Resources » NSX-ALB in the VCD Provider Portal
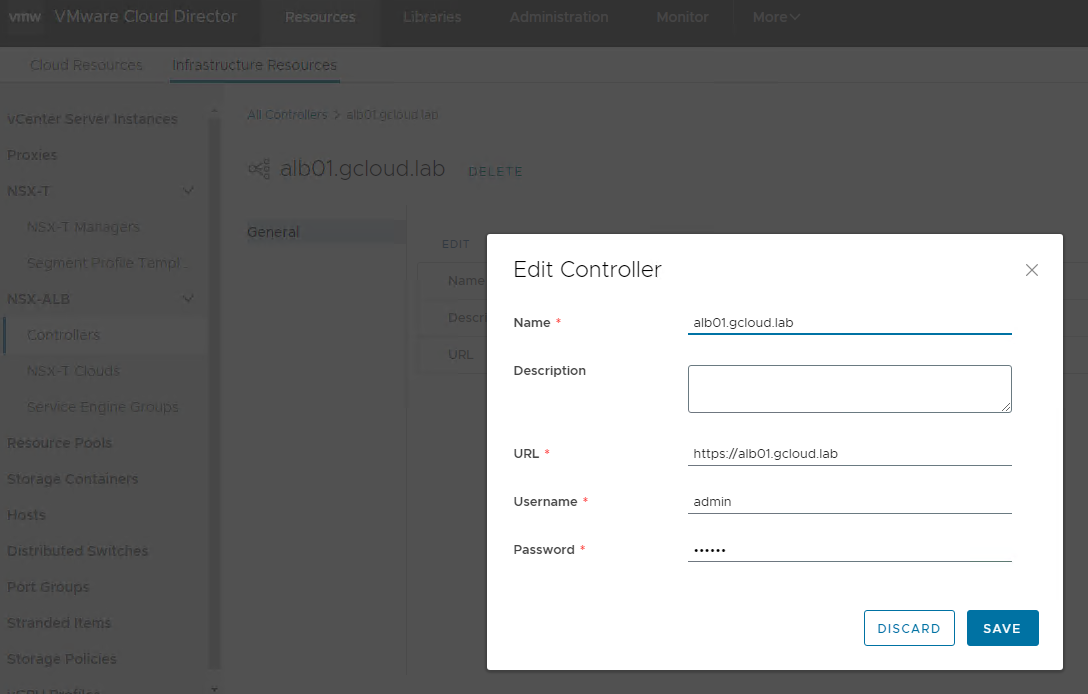
Add NSX Advanced Load Balancer Controller
Add the NSX ALB Controller under Resources » Infrastructure Resources » NSX-ALB » Controllers
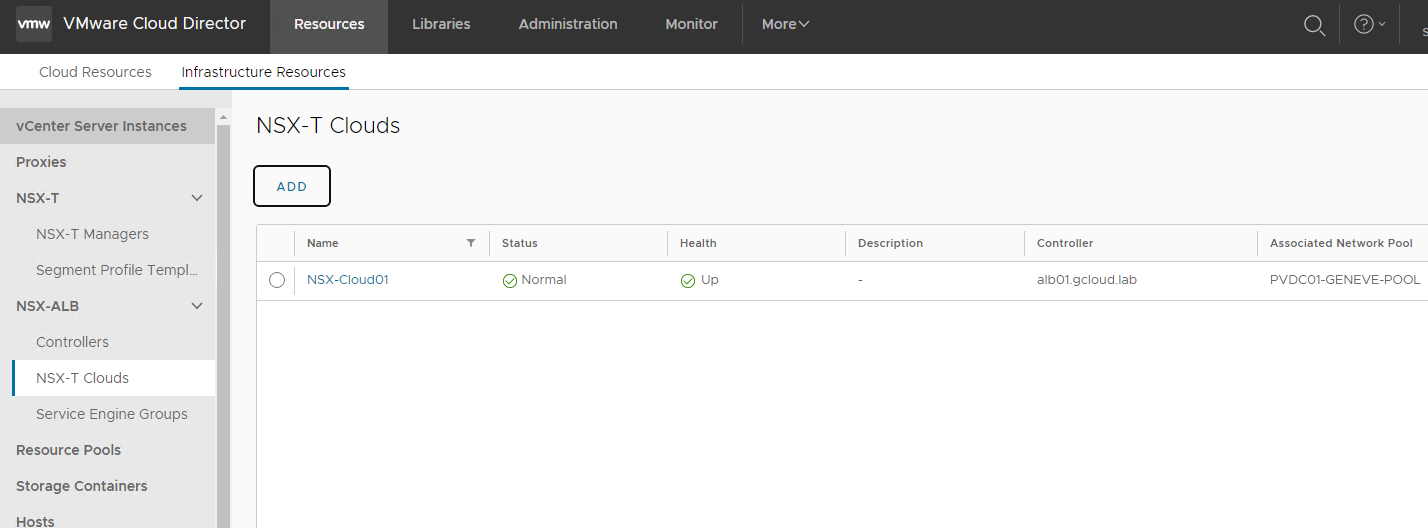
Add NSX-Cloud, this should just be a drop down option as its querying the ALB Controller itself
Add NSX Cloud
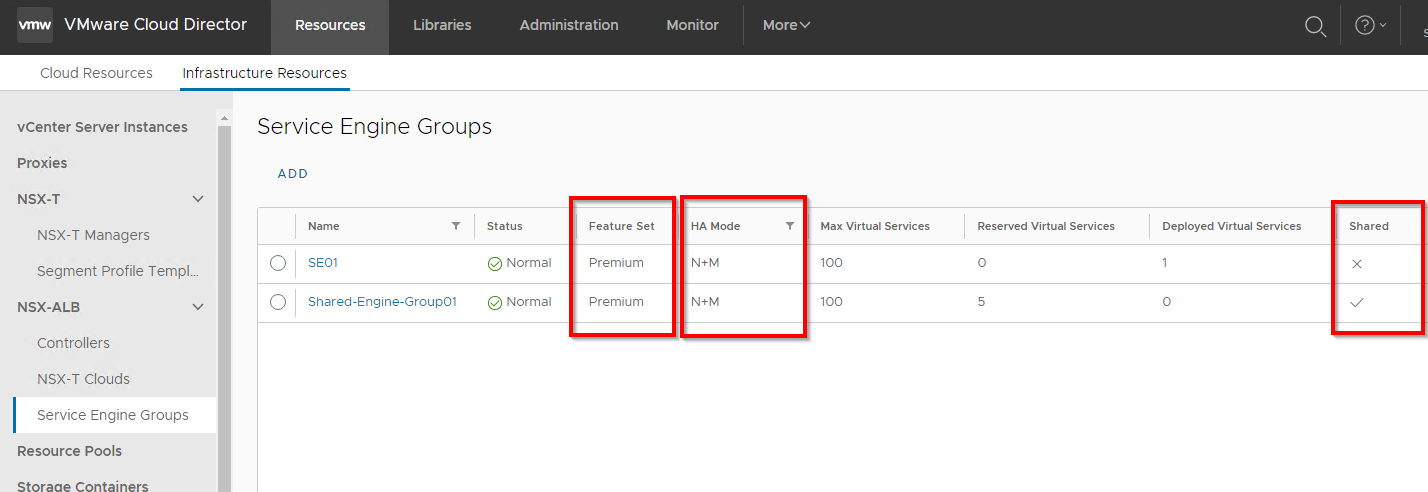
Service Engine Groups
Create a new SEG in NSX ALB and add it here, this section you can control whether this SEG is Shared or Dedicated to a Tenant, the HA Mode of the Service Engine Group, and the feature set of the SEG itself.
Information about NSX ALB HA Modes https://docs.vmware.com/en/VMware-NSX-Advanced-Load-Balancer/21.1.4/Installation_Guide/GUID-7E4C010C-875A-421D-938D-97E262913291.html
Information on Standard and Premium ALB features https://docs.vmware.com/en/VMware-NSX-Advanced-Load-Balancer/20.1.4/Administration_Guide/GUID-B5EC8F3B-A75E-4809-A653-6EBE08CFED81.html
Tenant Configuration
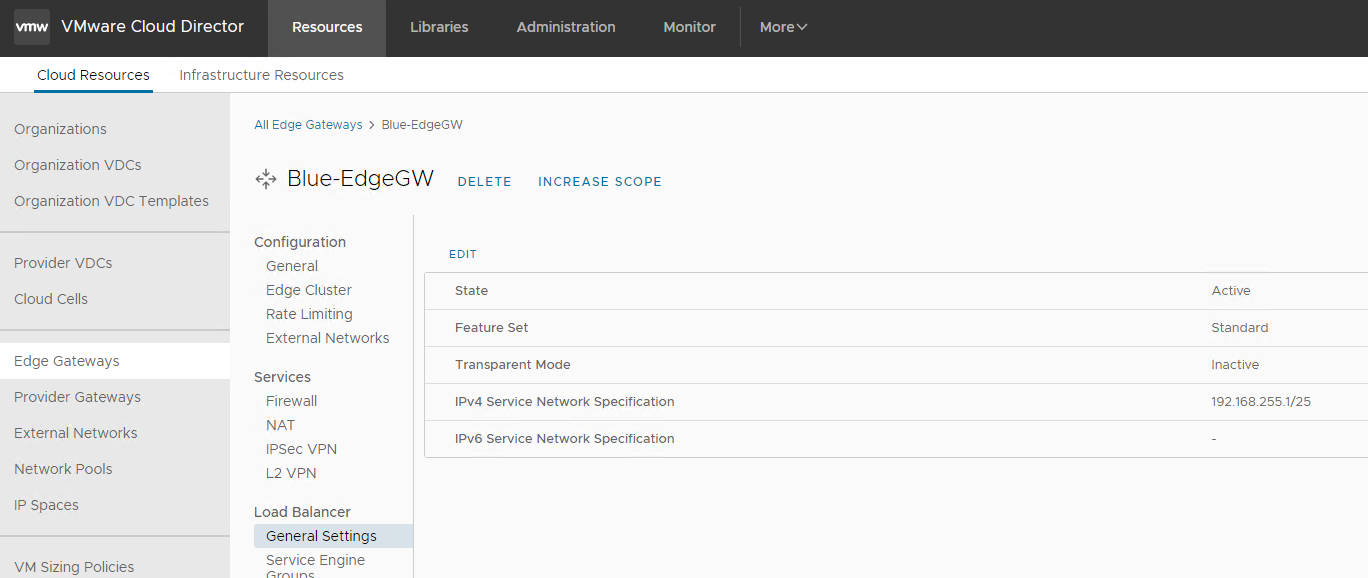
This tenant named Blue already has an Edge Gateway Deployed. The Tenant has an IP Space configured with both available IP Prefixes and Floating IPs as well. The Load Balancer functionality properties are located on the Edge itself
Enable Load Balancer on the Edge Gateway
Enable the Load Balancer here, this will then present other configuration options to the Provider, In NSX a Segment will be created and linked to this Edge Gateway, a Service Engine will also be deployed with an interface on this segment, this is the NSX ALB Data Network.
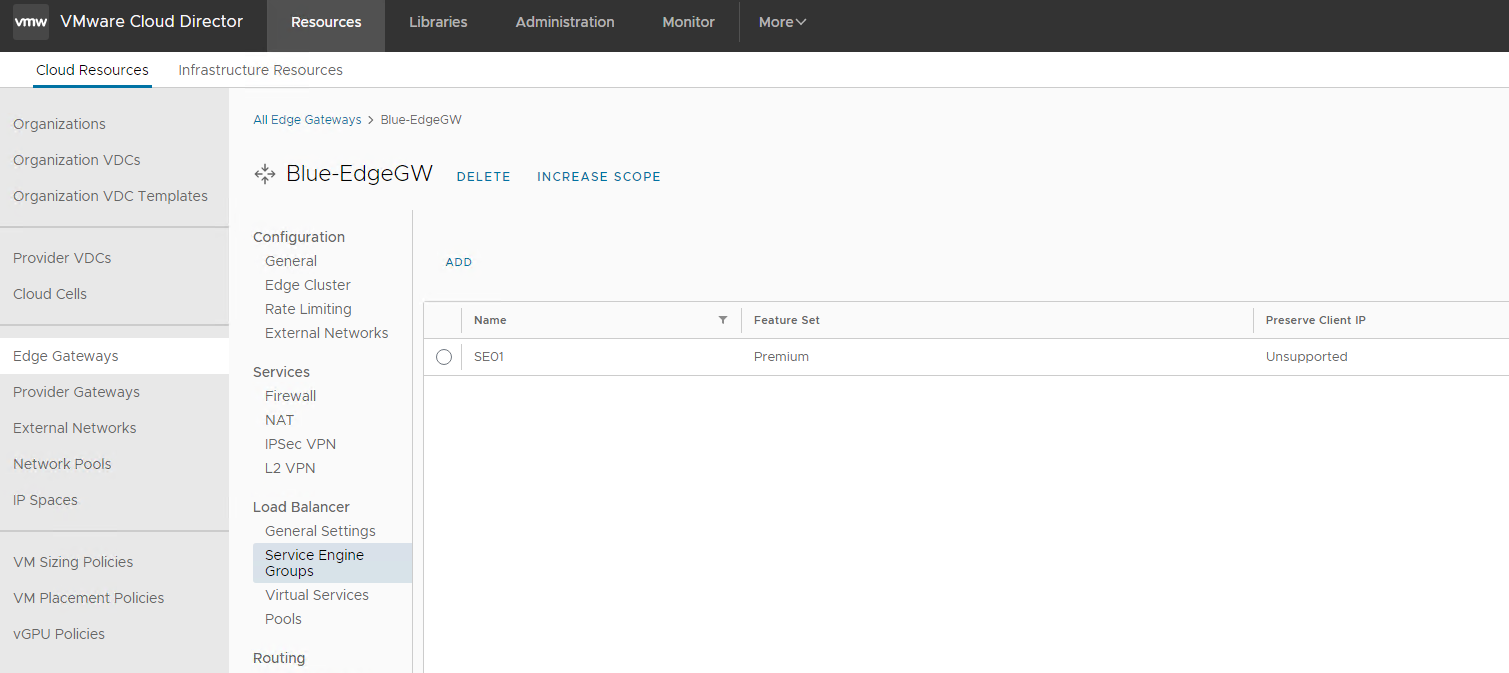
Allocate Service Engine Groups
Allocate a Service Engine Group to this Edge Gateway, the SEGs were created within the NSX ALB interface and then added into VCD.
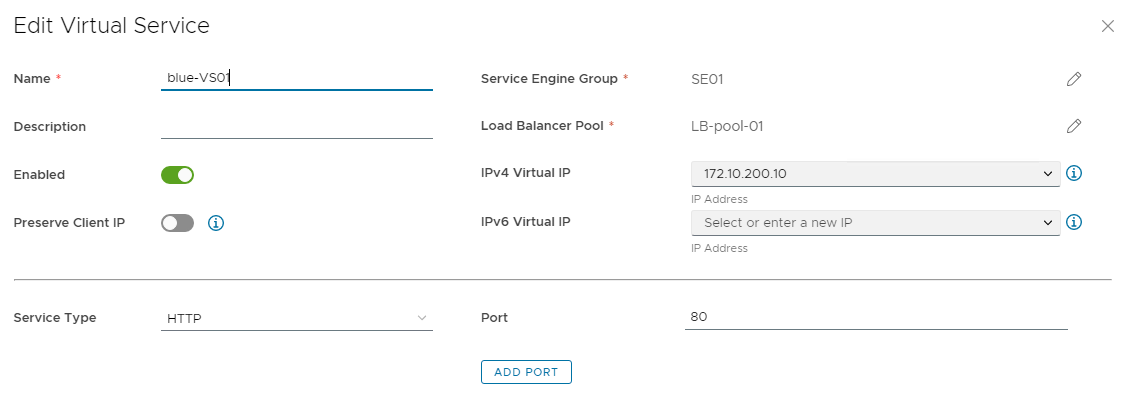
Create Virtual Service
From here on you are preparing an application to consume Load Balancer services, below is an example created in this VCD tenant.
A Virtual Service Defines the following
- The Service Engine Group to use
- The Virtual IP of the Load Balancer / In this example this was a floating IP assigned to this VIP via IP Spaces in VCD 10.4.2
- Service Type: e.g HTTP
- Port: e.g 80
- Load Balancer Pool: Allocate Pool members for this load balancer which is done in the next step.
Once this is created, in NSX a static route is created for the VIP to traverse via the Data Network in NSX ALB
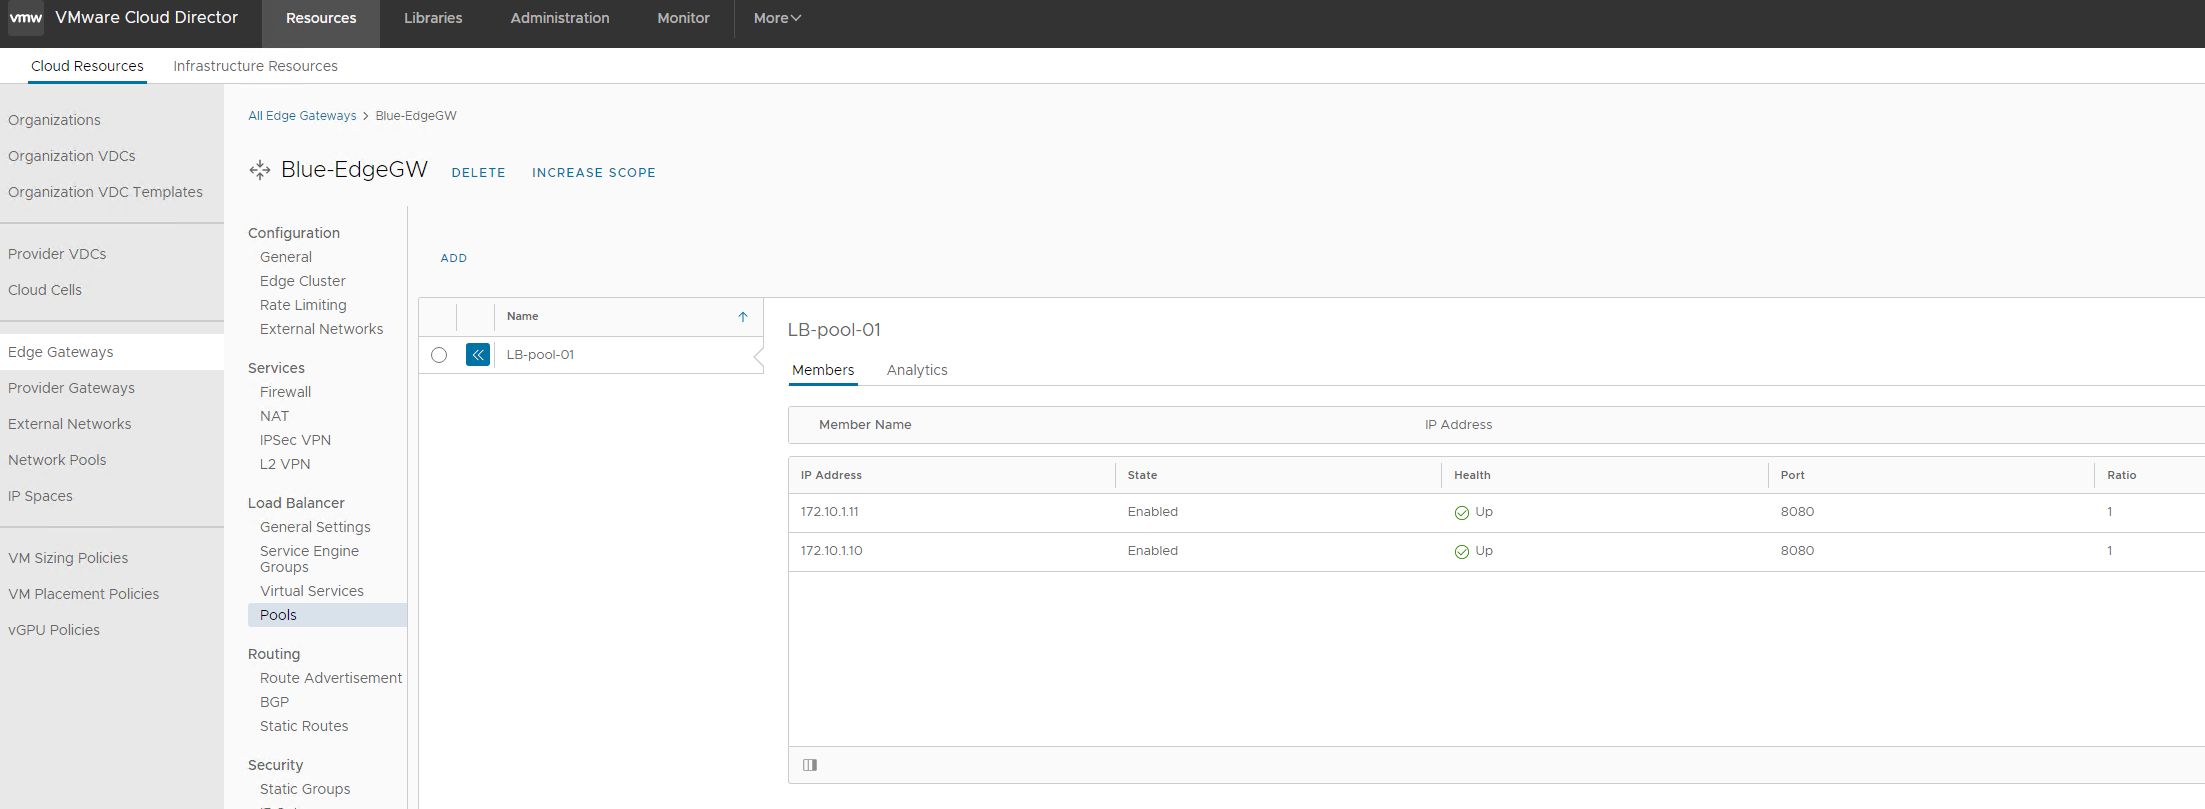
Create Pool
Create a Pool and add your application members
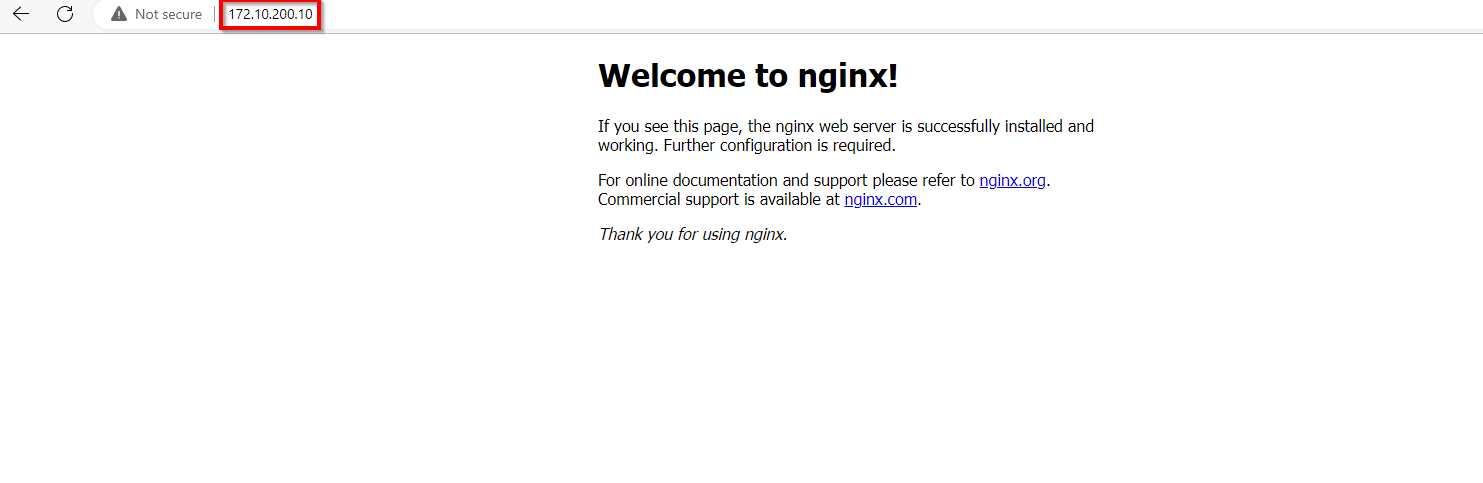
Testing
In my tenancy I created 2 X Photon OS machines with NGINX Docker containers. I added these servers to my Pool and was able to access the NGINX page from the Virtual IP set inside the NSX Advanced Load Balancer.
Thank you for reading :)